The play in this new version of Pathfinder is very similar to the
previous version. Most of the time, you’ll be in what we call
exploration mode, traveling from place to place, exploring dungeons,
and solving problems. This form of play is very free-form, allowing
you to jump into the story whenever there’s something you want
your character to do.
When monsters appear, you’ll enter encounter mode. During
this type of play, you’ll make a special die roll for initiative, which
determines the order of your turns during an encounter. What type
of check you’ll make when you roll initiative is based on what you
were doing just before the fight began.
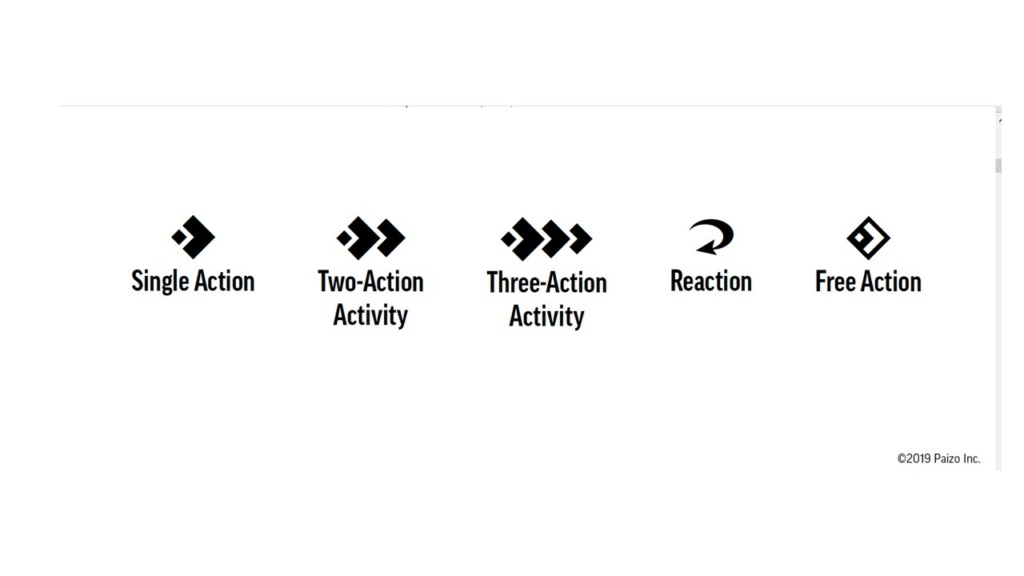
When it’s your turn, you can perform up to three actions. Most
common tasks—like moving up to your Speed with a Stride, Striking a
creature, drawing a weapon, or opening a door—use one of your three
actions. Casting spells, as well as some special actions, might take
two or more actions to perform. If you look at your character sheet,
you’ll see that abilities that require you to spend an action are noted
using a diamond symbol ([one-action]), whereas things that require more than
one are noted by diamonds stacked on each other ([two-actions] and [three-actions]).
Some abilities have a curving arrow next to them ([reaction]). These are your
reactions. Each round, you can use one reaction whether it’s your
turn or not, but only when the conditions are right and the reaction’s
trigger occurs. Finally, you might see some things noted by an empty
diamond ([free-action]). These are free actions, which don’t cost you an action
or reaction to use. Some free actions can be used on your turn, and
some, like reactions, can be used at any time, but only when their
trigger occurs.
Throughout the game, you’ll be asked to make rolls or checks,
like an attack roll, a skill check, or a saving throw. In all cases, you
roll a d20 and add the bonus listed next to the specific attack, skill,
or saving throw. The result is then compared to a Difficulty Class
(or Armor Class, for an attack) to determine if it’s a success. If the
check was an attack roll, and you hit, I’ll ask you to roll damage. The
dice you roll for damage depend on the attack and is listed with that
attack.
When rolling, keep an eye out for any roll that is a 20 or a 1 on
the d20. A 20 is a critical success, which is really good, often giving
you additional advantages. A 1 is a critical failure, which is generally
pretty bad. You can also score a critical success by beating the DC by
10 or more, or a or failure by missing it by 10 or more.
An important rule you’ll need to remember for this adventure
is that if you use more than one attack in a turn, each attack after
the first takes a penalty on your roll to hit, making it less likely to
successfully damage the enemy. For most weapons, this is a –5
penalty for each attack after the first, but for agile weapons such as
daggers, the penalty is only –4.
When you’re attacked, I’ll ask if a monster’s attack roll is equal
to or exceeds your Armor Class (or AC). If it does, you’re hit and will
take damage. Damage reduces your Hit Points by the same amount.
If you fall to 0 Hit Points, you fall unconscious and might die!
One last thing. Each of you has a token. This represents your
Hero Point—a special point you can spend after rolling any attack,
check, or saving throw to reroll that d20. When you do, you must use
the result of this second roll, even if its lower than your first. You can
instead spend your point to cheat death when your dying condition
increases, which makes you immediately lose the dying condition
and stabilize with 0 Hit Points. I’ll explain the dying condition later
if we need it.
I’m sure you’ll have other questions as the game progresses.
Feel free to ask me at any time.
previous version. Most of the time, you’ll be in what we call
exploration mode, traveling from place to place, exploring dungeons,
and solving problems. This form of play is very free-form, allowing
you to jump into the story whenever there’s something you want
your character to do.
When monsters appear, you’ll enter encounter mode. During
this type of play, you’ll make a special die roll for initiative, which
determines the order of your turns during an encounter. What type
of check you’ll make when you roll initiative is based on what you
were doing just before the fight began.
When it’s your turn, you can perform up to three actions. Most
common tasks—like moving up to your Speed with a Stride, Striking a
creature, drawing a weapon, or opening a door—use one of your three
actions. Casting spells, as well as some special actions, might take
two or more actions to perform. If you look at your character sheet,
you’ll see that abilities that require you to spend an action are noted
using a diamond symbol ([one-action]), whereas things that require more than
one are noted by diamonds stacked on each other ([two-actions] and [three-actions]).
Some abilities have a curving arrow next to them ([reaction]). These are your
reactions. Each round, you can use one reaction whether it’s your
turn or not, but only when the conditions are right and the reaction’s
trigger occurs. Finally, you might see some things noted by an empty
diamond ([free-action]). These are free actions, which don’t cost you an action
or reaction to use. Some free actions can be used on your turn, and
some, like reactions, can be used at any time, but only when their
trigger occurs.
Throughout the game, you’ll be asked to make rolls or checks,
like an attack roll, a skill check, or a saving throw. In all cases, you
roll a d20 and add the bonus listed next to the specific attack, skill,
or saving throw. The result is then compared to a Difficulty Class
(or Armor Class, for an attack) to determine if it’s a success. If the
check was an attack roll, and you hit, I’ll ask you to roll damage. The
dice you roll for damage depend on the attack and is listed with that
attack.
When rolling, keep an eye out for any roll that is a 20 or a 1 on
the d20. A 20 is a critical success, which is really good, often giving
you additional advantages. A 1 is a critical failure, which is generally
pretty bad. You can also score a critical success by beating the DC by
10 or more, or a or failure by missing it by 10 or more.
An important rule you’ll need to remember for this adventure
is that if you use more than one attack in a turn, each attack after
the first takes a penalty on your roll to hit, making it less likely to
successfully damage the enemy. For most weapons, this is a –5
penalty for each attack after the first, but for agile weapons such as
daggers, the penalty is only –4.
When you’re attacked, I’ll ask if a monster’s attack roll is equal
to or exceeds your Armor Class (or AC). If it does, you’re hit and will
take damage. Damage reduces your Hit Points by the same amount.
If you fall to 0 Hit Points, you fall unconscious and might die!
One last thing. Each of you has a token. This represents your
Hero Point—a special point you can spend after rolling any attack,
check, or saving throw to reroll that d20. When you do, you must use
the result of this second roll, even if its lower than your first. You can
instead spend your point to cheat death when your dying condition
increases, which makes you immediately lose the dying condition
and stabilize with 0 Hit Points. I’ll explain the dying condition later
if we need it.
I’m sure you’ll have other questions as the game progresses.
Feel free to ask me at any time.